
Step into a realm where whimsy meets elegance with these enchanting forest fairy nail designs.
Imagine your fingertips adorned with delicate motifs inspired by the lush greens and mystical creatures of the woods.
Fairy nail art captures the magic of nature, from twinkling stars to blooming flowers, creating a shimmering palette that radiates charm.
These designs are perfect for any occasion, whether you’re attending a festival or simply looking to add a touch of enchantment to your everyday life. Let’s wander through this enchanted forest of creativity and discover the perfect look for your next manicure!
Contents
- 1. Mossy Green Delights
- 2. Glimmering Fairy Dust
- 3. Enchanted Floral Patterns
- 4. Twilight Ombre Magic
- 5. Woodland Creatures
- 6. Shimmering Fairy Wings
- 7. Crystal-Clear Reflections
- 8. Magical Forest Shadows
- 9. Ethereal Glowing Lights
- 10. Dreamy Lavender Fields
- 11. Twinkling Starry Night
- 12. Whimsical Watercolor
- 13. Nature’s Whispers
1. Mossy Green Delights
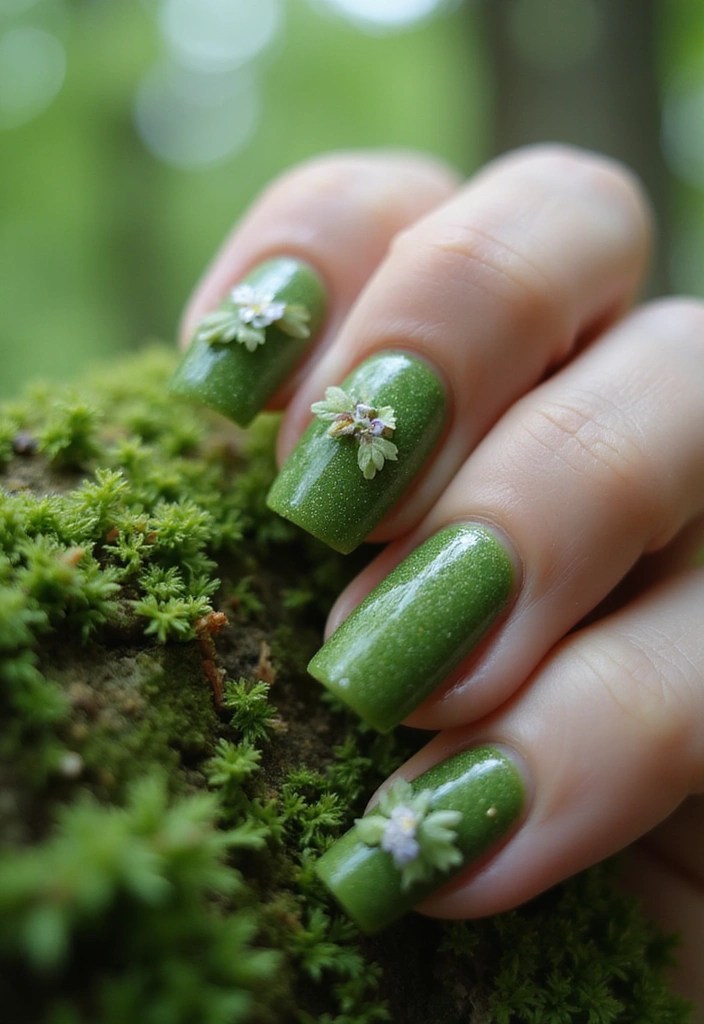
Mossy Green Delights takes inspiration from the soft carpet of moss found in deep, serene forests. This design features muted green shades that evoke a calm, woodland vibe. For the base, use a rich green polish, then blend lighter shades for an ombré effect, reminiscent of the forest floor.
To add an element of surprise, consider incorporating tiny, delicate leaves or miniature flowers on a couple of accent nails using nail art stickers – leaves and flowers. These self-adhesive decals make it easy to achieve the intricate designs without the hassle of freehand painting. The key is to keep it earthy yet elegant.
For a natural finish, don’t forget to apply matte top coat nail polish which will help to enhance that forest-like vibe. Finally, seal the look with a layer of glossy top coat nail polish for that magical sheen that catches the light, adding a final touch of enchantment to your nails.
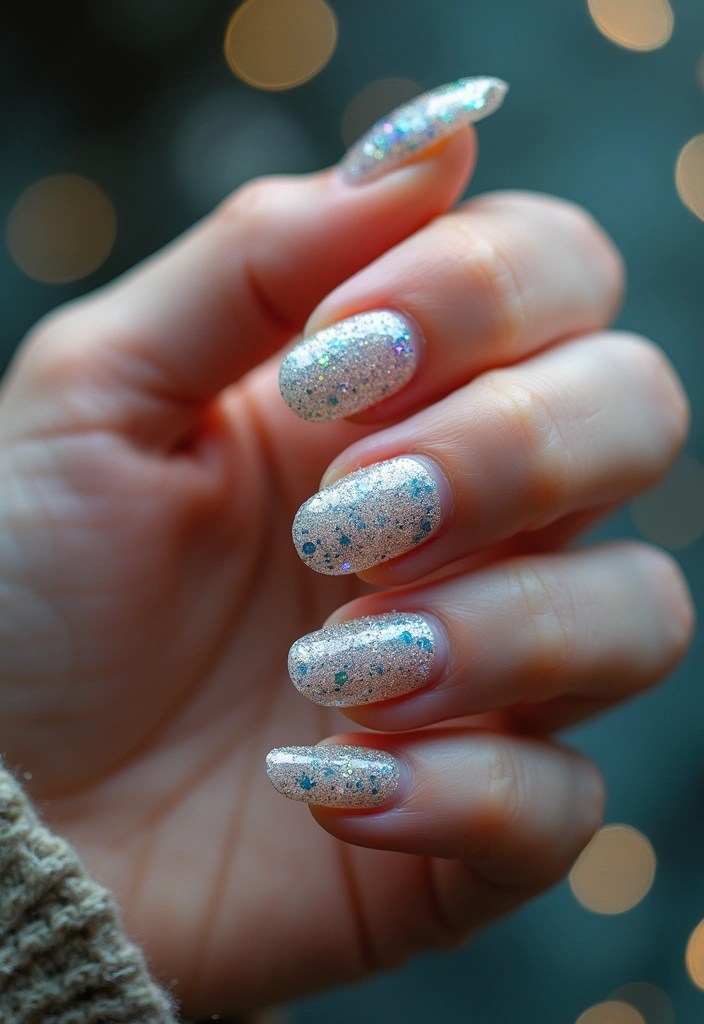
2. Glimmering Fairy Dust
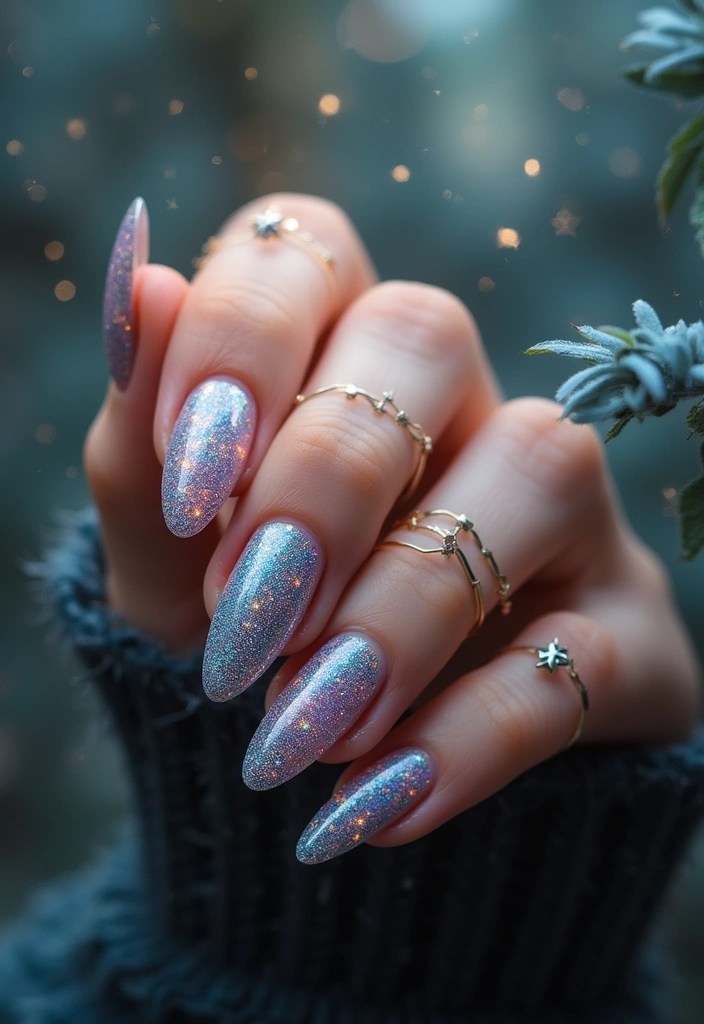
Glimmering Fairy Dust embodies the sparkle of a fairy’s touch.
Start with a nude or light pink base for a clean canvas. To achieve that dazzling effect that sparkles under any light, apply a generous layer of Rimmel London holographic nail polish top coat. This holographic glitter polish adds a stunning shine that truly captures the essence of fairy magic.
For a whimsical twist, enhance the magical allure with tiny star and moon decals. The Star and Moon Nail Decals are perfect for this purpose, lending an enchanting touch to your design.
Finish this look with a clear top coat to smooth out the glitter and add an extra layer of shine. The Barry M nail paint, 3 in 1 base coat, top coat, nail hardener all in one will not only protect your design but also give it a glossy finish.
For achieving the best results:
– Apply glitter polish in thin layers to build up depth without overwhelming the base.
– Use a makeup sponge for a gradient effect if you want to blend colors seamlessly.
– Remember to let each layer dry completely before adding another to avoid smudging that fairy dust!
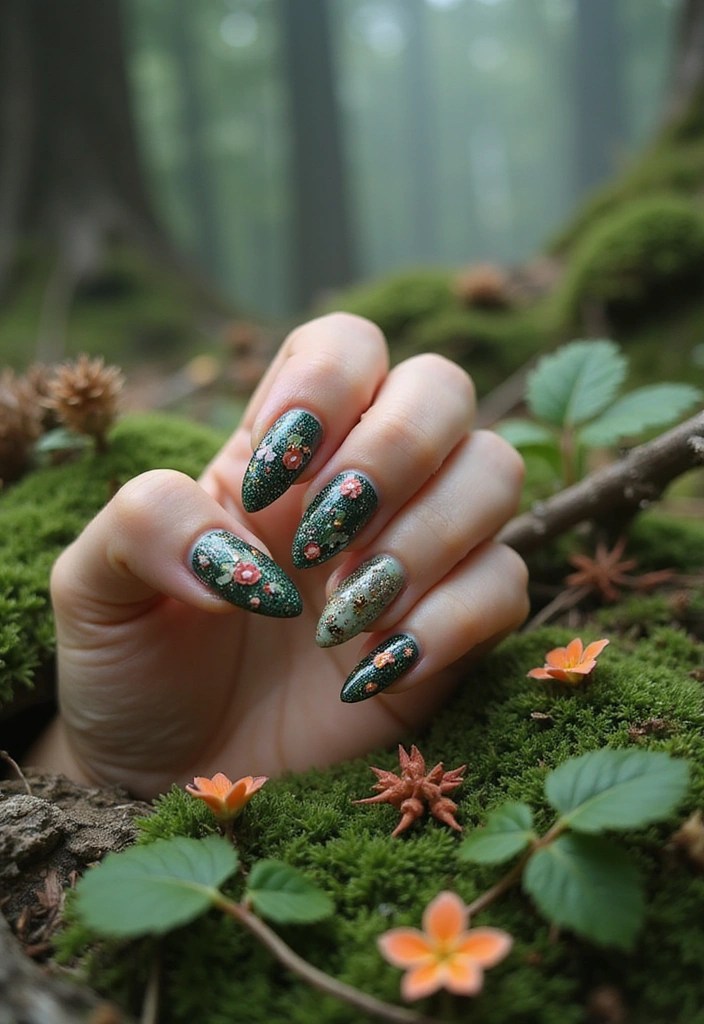
3. Enchanted Floral Patterns
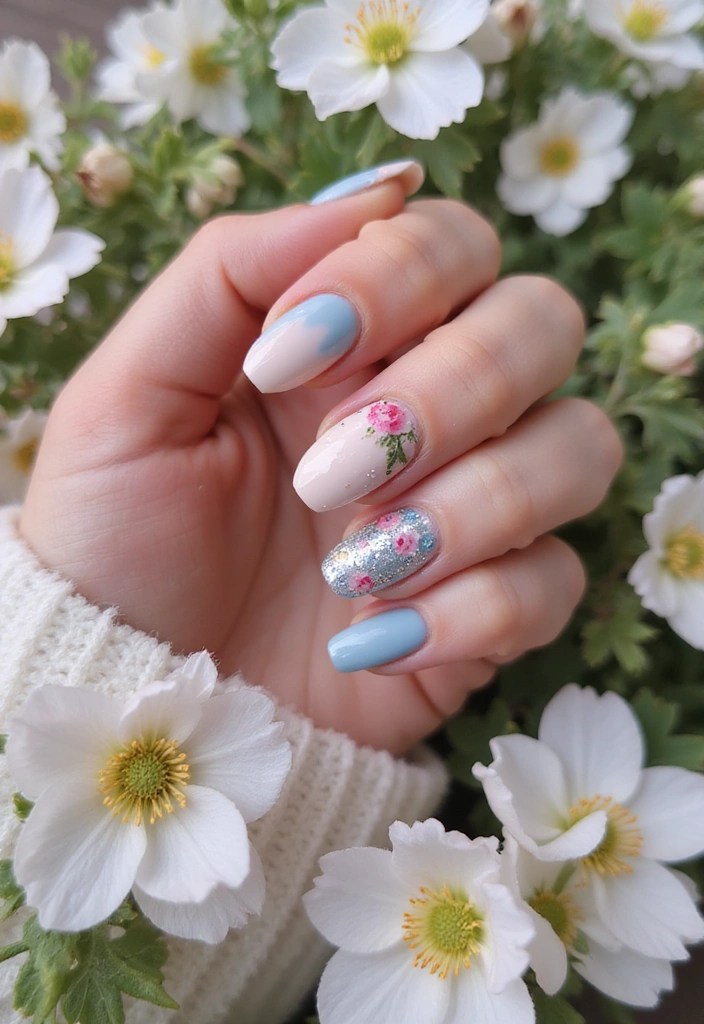
Embrace the beauty of a blooming meadow with Enchanted Floral Patterns. This design features hand-painted flowers in soft pastels, offering a tender touch of nature’s beauty. Choose a light base color like lavender or sky blue, and use a fine brush to create floral designs on each nail. For precision in your flower detailing, the nail art brush set is essential. It includes double-ended brushes that allow you to navigate the intricacies of each petal perfectly.
Accentuate your design with tiny dots to resemble dew drops for added depth. To achieve this, the nail art dotting tools are a great choice. This set features various sizes, making it easy to create those delicate details that bring your floral patterns to life.
Get playful with the colors, mixing pinks, yellows, and whites for a fun floral tapestry. For best results, seal your artwork with the matte top coat nail polish for a modern twist, or keep it glossy for a classic feel. Pair this look with minimal jewelry to let your nails stand out.
4. Twilight Ombre Magic
Twilight Ombre Magic captures the transition from day to night with an enchanting gradient that evokes the skies at dusk. Start with a soft blue at the cuticle, blending into a deep purple or navy at the tips. This design symbolizes the magical time when fairies come out to play.
To achieve that seamless blend, a nail art sponge is your best friend; it allows for smooth transitions between colors without harsh lines. Elevate this look by adding silver or gold line art in swirls or crescent shapes, reminiscent of stars appearing in the evening sky. For creating tiny stars or sparkly gems, a dotting tool set is perfect, enabling precise details that enhance your design.
Finally, seal your masterpiece with a glossy top coat to boost the vibrancy of the gradient and ensure a long-lasting finish. This step not only enhances the colors but also adds a beautiful shine that mimics the sparkling effect of twilight.
5. Woodland Creatures
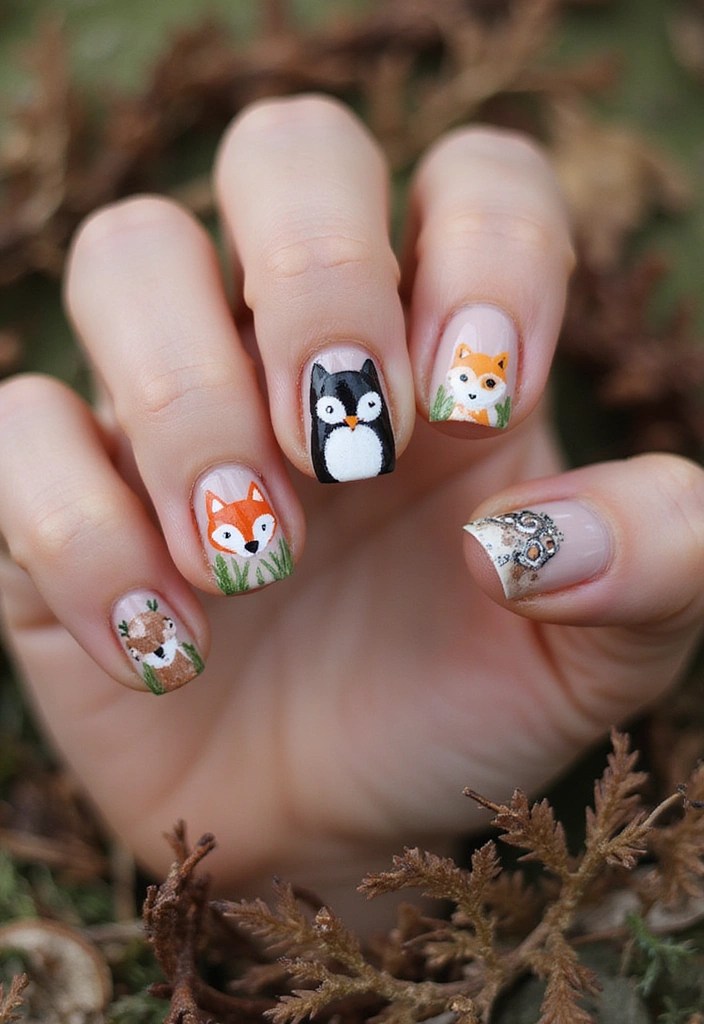
Channel the spirit of the forest with Woodland Creatures nail designs, showcasing adorable animals like foxes, owls, or even tiny deer. These playful designs can be incorporated as accent nails, with the rest of your nails painted in earthy browns and greens. For a simpler approach, you might consider using nail art decals to bring your woodland friends to life without the need for intricate hand-painting.
To make these designs pop, choose a matte finish for the animal designs, creating a contrasting texture with glossy backgrounds. A great option for this is the Barry M Cosmetics matte top coat, which will help the creatures stand out beautifully against shiny nails. Layering a clear top coat over the designs will also protect your artwork for lasting charm.
For those who enjoy the art of painting, consider using a detail nail art brush set. This set is perfect for adding fine details to your woodland creatures, ensuring that their features shine through. With these tools and tips, you can easily create enchanting nail designs that feel right out of an enchanted woods.
6. Shimmering Fairy Wings
Shimmering Fairy Wings nail art draws inspiration from the ethereal beauty of fairy wings. Start with a clear or sheer base color to create a delicate canvas. To mimic the enchanting shimmer of wings, incorporate iridescent flakies such as the holographic mermaid nail art glitter flakes. These pieces will provide a stunning depth and dimension to your design, making it truly magical.
Layering different shapes and colors of flakies will enhance the uniqueness of your nails. To define the wings further or to create swirling patterns that resemble fairy flight paths, use fine lines of glitter. A great option for this is the fine glitter nail art set, which offers a variety of colors sure to complement your shimmering wings.
When applying flakies, precision is key. Utilizing nail art tweezers can help you place each piece exactly where you want it for a clean and intricate design.
Things to keep in mind: ensure each layer dries well to maintain the integrity of the design. Finally, top it off with a glossy coat to enhance that iridescent effect and make your nails shine like the magical wings they represent.
7. Crystal-Clear Reflections

Crystal-Clear Reflections offers a fresh, clean look that embodies the essence of dew on leaves. To achieve this enchanting style, start with a base of clear or very light polish, such as Barry M Nail Paint, 54 , 3 in 1 Base Coat, Top Coat, Nail Hardener All in One, Clear. This versatile product not only acts as a base but also ensures your nails are protected and polished to perfection.
For that magical touch, sprinkle a bit of reflective silver or holographic powder over the top. The Holographic Chrome Nail Powder delivers a stunning laser rainbow mirror effect that captures light beautifully, enhancing the overall sparkle. This minimalist approach remains both enchanting and elegant, making it perfect for any occasion.
To elevate this look further, consider adding tiny rhinestones for an extra hint of glamour. The 4200pcs Rhinestones for Nails set comes with a variety of crystals and a wax pencil for easy application, allowing you to place the gems strategically for just the right amount of sparkle.
If you prefer a more understated finish, a matte top coat can provide a modern twist. Just remember to apply even layers of the reflective powder for consistent shine, ensuring your nails radiate that enchanting woodland vibe.
8. Magical Forest Shadows
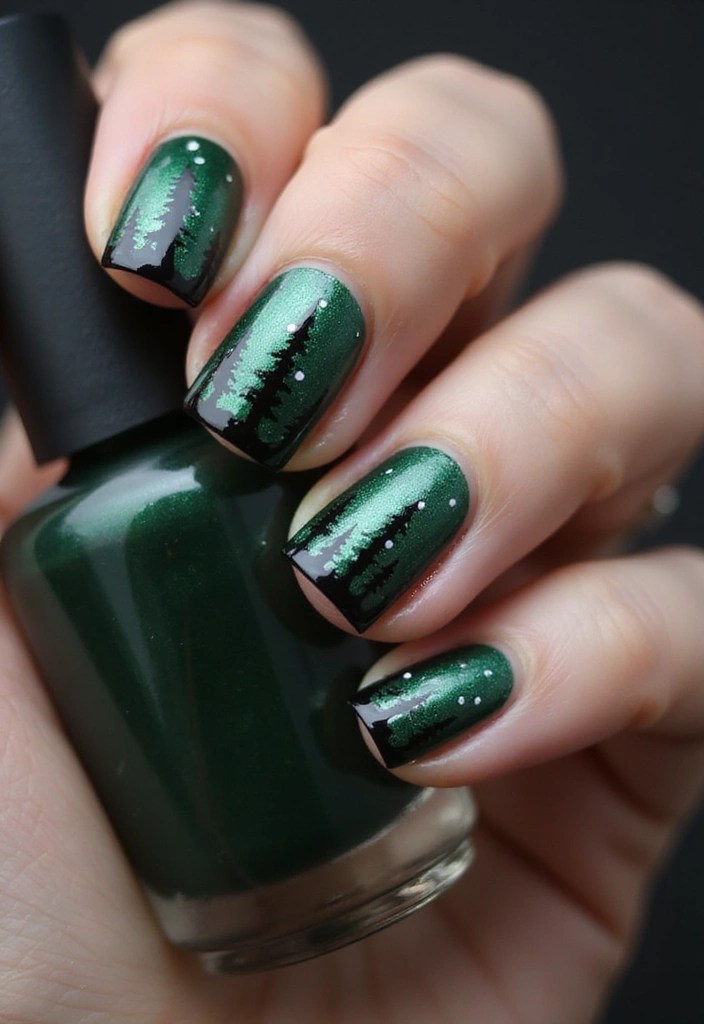
Magical Forest Shadows is perfect for those who adore darker, moodier themes. To achieve this enchanting look, utilize deep greens and blacks to create a shadow effect that represents the mysterious depths of the forest. Consider blending shades to create an ombré effect, starting with lighter colors at the cuticle and transitioning to dark at the tips. Adding silhouettes of trees or stars will enhance the overall mystique.
For this captivating design, nail art tape is a great tool to help you create sharp lines for tree silhouettes, ensuring clean and defined edges. A fine detail nail brush set is essential for adding intricate details, making sure that your shadow effects look seamless and professional. Finally, finishing off your design with a matte top coat nail polish will emphasize the dark, mysterious vibe of your nails, giving them a captivating matte finish that truly reflects the essence of an enchanted forest.
9. Ethereal Glowing Lights
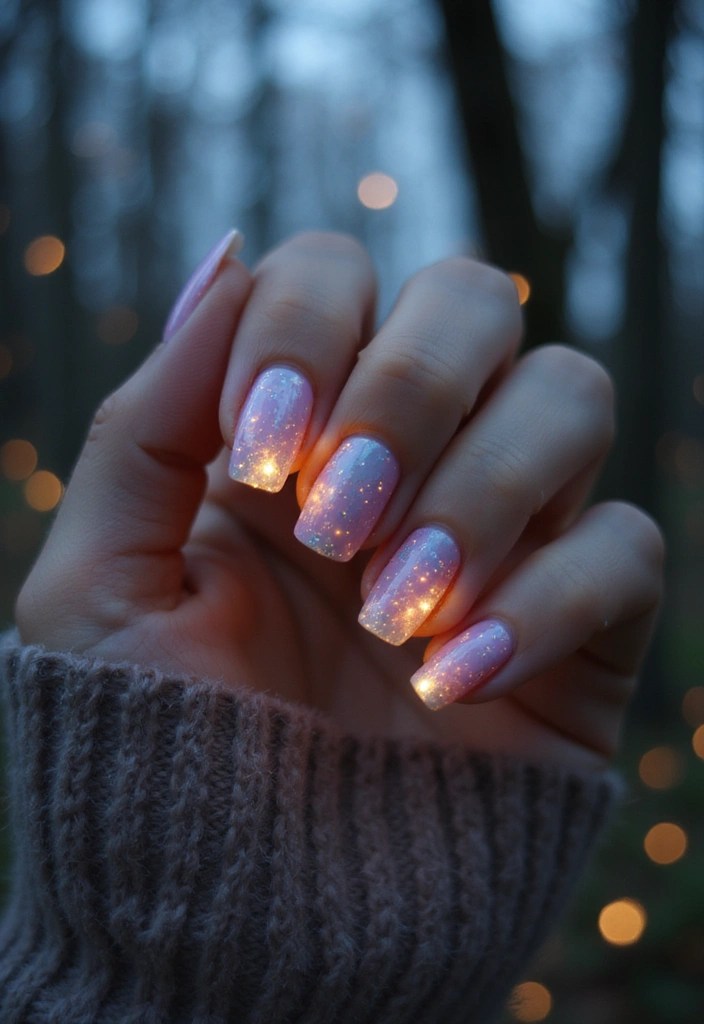
Ethereal Glowing Lights nail art represents the magical glow of fireflies in the twilight. To achieve this enchanting effect, start with a soft pastel base color and add tiny glowing dots or sparkles to mimic those mesmerizing lights. For an extra touch of magic, consider using neon or glow-in-the-dark polish, like the Sally Hansen Glow in the Dark Insta-Dri Nail Color (#720 – Fa-BOO-lous). This polish will ensure your design truly shines when the sun sets.
For the best results, a fine dotting tool is essential. The Fine Dotting Tool Set includes five tools that will help you create tiny, even dots effortlessly, ensuring that your design looks polished and professional. Layering different colors can also add to the mesmerizing effect, making your nails look like they belong in an enchanted forest.
Finally, don’t forget to seal your design with a high-gloss top coat, such as the Rimmel London Ultra Shine Nail Polish Top Coat. This will enhance the vibrant colors and give your nail art a stunning finish, allowing those ethereal glowing lights to truly pop.
10. Dreamy Lavender Fields
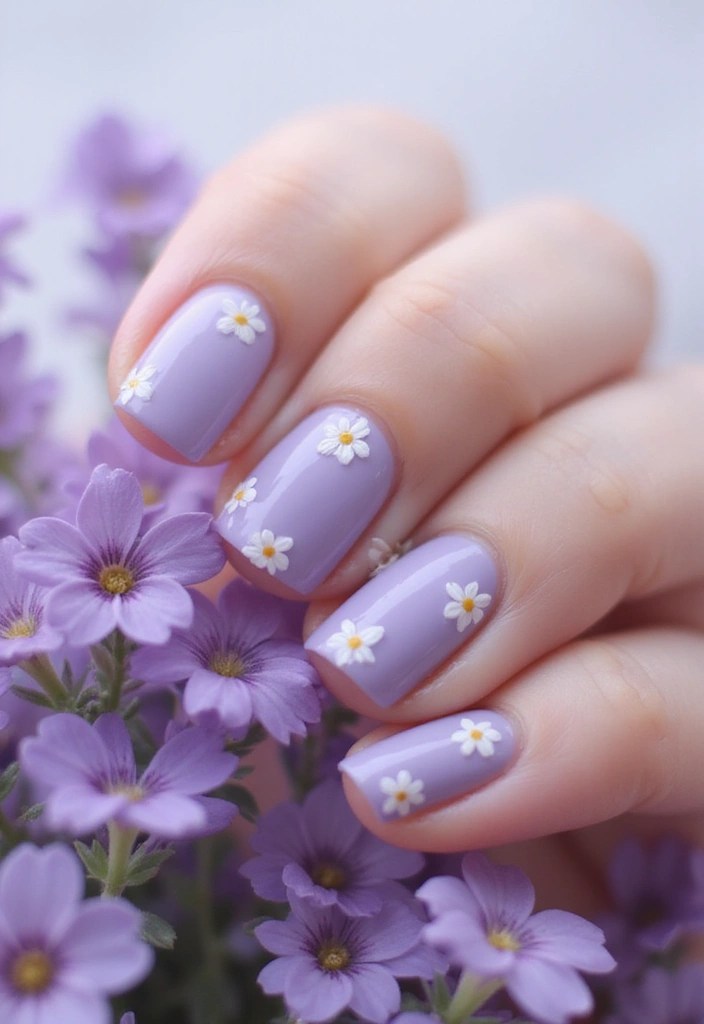
Dreamy Lavender Fields invites an aura of serenity with lilac and lavender tones reminiscent of blooming lavender fields.
Begin with a light lavender base and add deeper shades in a gradient or floral pattern. Tiny white dots can resemble the delicate lavender blooms, creating a charming design. To achieve this beautiful effect, consider using a fan brush for nail art. This tool is perfect for creating the easy floral effects that enhance the dreamy vibe of your nails.
For the finishing touches, apply a matte top coat, like the Barry M Cosmetics matte nail paint top coat, to achieve a soft finish that feels ethereal. If you prefer a more vibrant bloom effect, you could opt for a glossy top coat, such as the Barry M super size wet set quick dry topcoat, which will add a striking shine to your design.
Experimenting with these products can help you create a serene lavender field look that feels straight out of an enchanted woods.
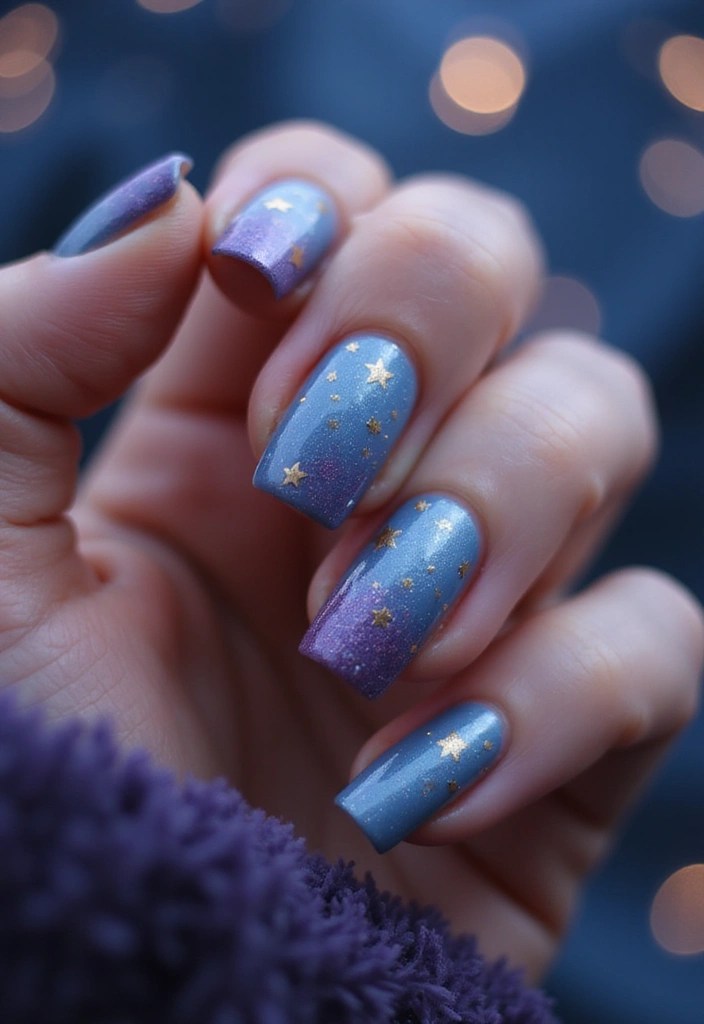
11. Twinkling Starry Night
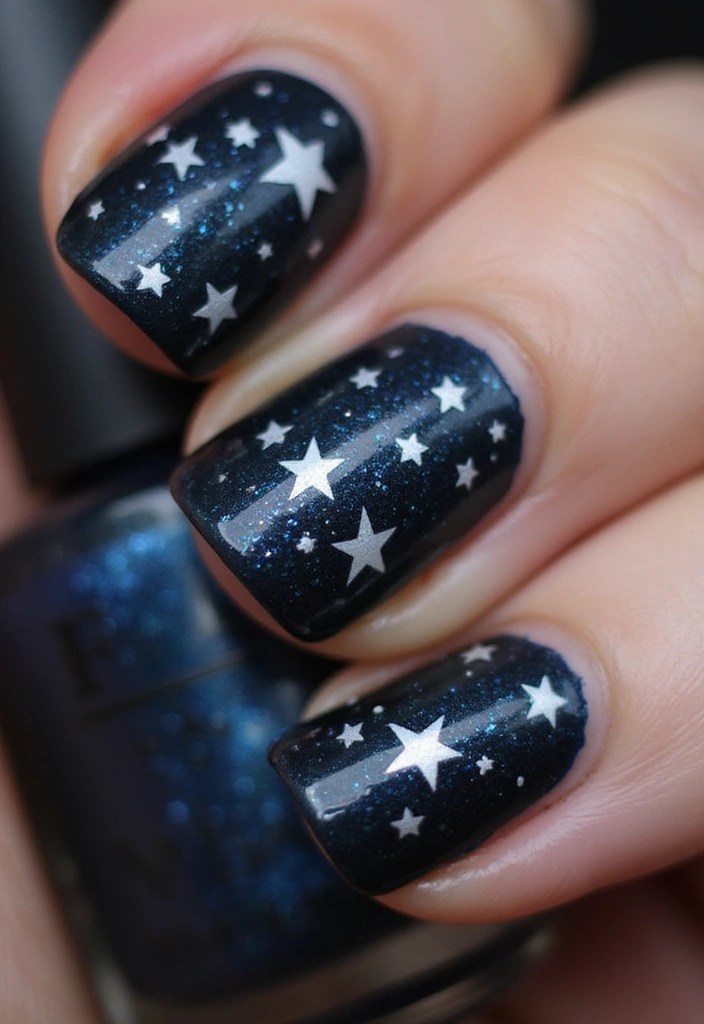
Twinkling Starry Night captures the beauty of a clear night sky filled with stars. Begin with a dark blue or black base, and use white or glitter polish to create star patterns scattered across each nail. For an added touch of elegance, consider using small star stickers or gems to represent constellations.
To achieve this look, you might want to start with a fine detail nail art brush set. This set includes various brushes that allow for precision when painting the star details, ensuring that your designs look professionally done. Next, layering glitter with a glitter nail polish will help create a magical twinkle effect, enhancing the night sky theme of your manicure.
Finally, to finish your design and ensure it lasts, consider adding some star nail art stickers. These 3D glitter star decals come in various colors and designs, making it easy to represent your favorite constellations on your nails. With these products, you’ll be able to capture the enchanting feel of a starry night right at your fingertips.
12. Whimsical Watercolor
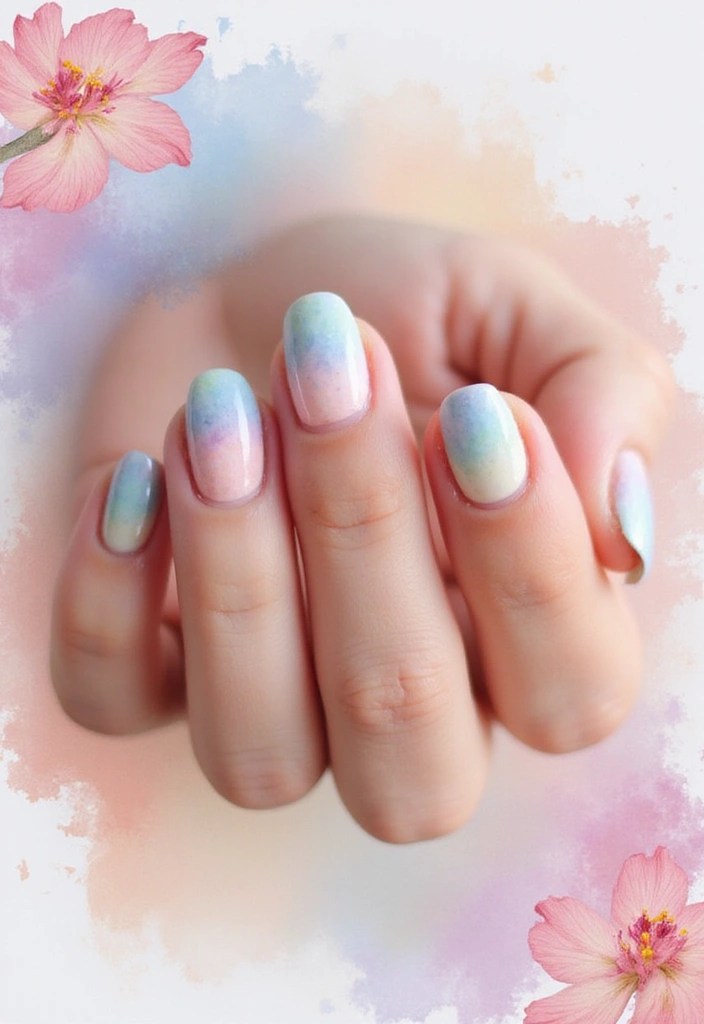
Whimsical Watercolor nails bring the art of soft blending and brush strokes to your fingertips. For this enchanting look, you’ll want to use a watercolor technique that combines water and polish to create a beautifully spreadable effect. Start with a white base to help your chosen colors pop, and consider experimenting with combinations that capture your fairy essence.
To achieve the dreamy effect reminiscent of flower petals or sky hues, I recommend using the Watercolor Nail Art Set. This set includes six pearlescent metallic colors that will perfectly blend together for that whimsical look.
Once you’ve applied your watercolor design, finishing touches are essential. To seal your art beautifully, choose between a matte or glossy finish. The Matte Top Coat Nail Polish provides a lovely texture that enhances the artistic quality of your nails.
For those intricate brush strokes and details, the Nail Art Brushes Set will be your best friend. This kit includes 15 acrylic nail brushes and 5 nail dotting tools, perfect for both DIY and professional use. Get creative and let your imagination run wild!
13. Nature’s Whispers
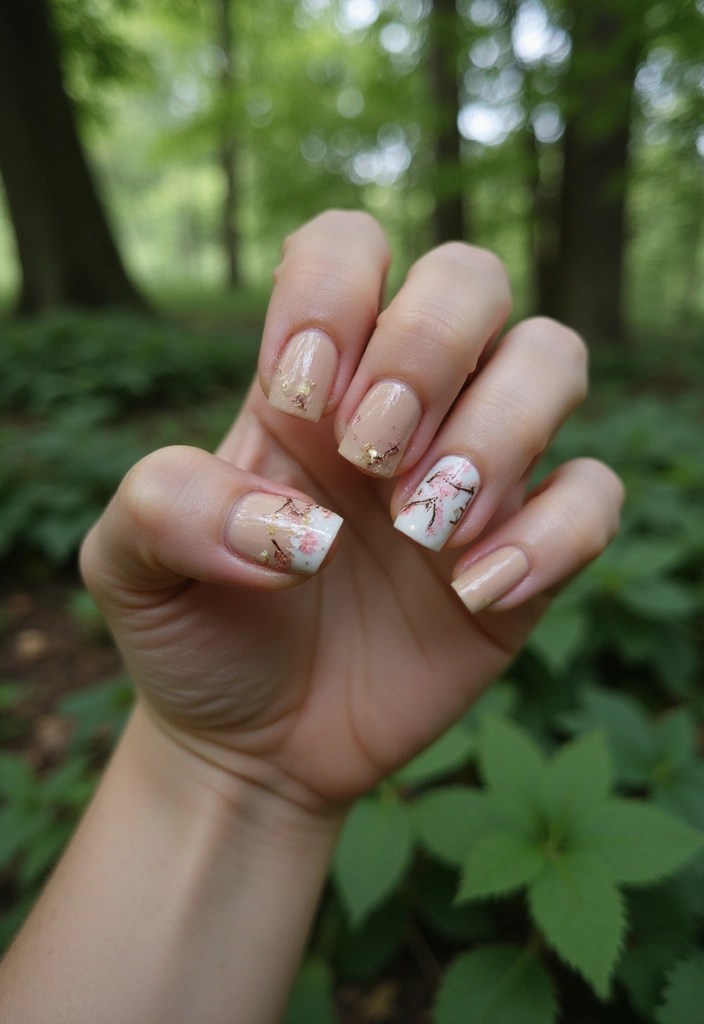
**13. Nature’s Whispers**
Nature’s Whispers captures the essence of subtle beauty found in the forest. Utilize neutral colors like taupe and soft greens, accentuating with delicate hand-painted whispers of vines or soft flowers. This understated look is perfect for those who want to embrace natural beauty without being too flashy.
To enhance this design, consider using small nail art beads and crystals set to represent drops of dew, adding a touch of sparkle that mimics nature’s charm. A fine brush is essential for creating intricate vine patterns; the nail art fine detail brush set will help you achieve those delicate designs with ease. Finally, seal the design with a high-gloss nail top coat to enhance the natural colors and textures, ensuring your artwork lasts longer and shines beautifully.
Conclusion
From whimsical creatures to tranquil florals, forest fairy nail designs allow for endless creativity and personal expression.
These enchanting styles bring the magic of the woods right to your fingertips, making them perfect for any occasion. Whether you choose bold colors or soft pastels, there’s a design here to suit every fairy soul. Let your nails shine and inspire others to embrace their own magical side!
Note: We aim to provide accurate product links, but some may occasionally expire or become unavailable. If this happens, please search directly on Amazon for the product or a suitable alternative.
This post contains Amazon affiliate links, meaning I may earn a small commission if you purchase through my links, at no extra cost to you.

Leave a comment